Wednesday, August 19, 2020

Sewing with Knits My Way, Part 3

It seems I really "got into" sewing knit garments about five years ago. I have learned much along the way, and I'm sharing some tips here.

Part one was posted here

Part two was posted here

3. My third tip is for garments which include bands. I always cut the bands first. Well, not always. The first time I made a garment with bands, I did not have enough fabric to cut any bands after I cut out the other pieces. Apparently, some of my best-learned lessons were learned the hard way.

Is there a pattern piece for the band, or is there a cut chart showing what size to cut the band? The neckbands I’ve been making lately are pattern pieces, but I will discuss both methods. Either way, the length of the band should follow the direction of the fabric with the most stretch.

CUT CHART?

Some garment instructions tell you what size to cut the bands. If the cut chart states that the band should be cut on the fold, read the next section carefully; if not, skip to the cutting section.

PATTERN PIECE?

When the pattern piece for a band has ends that are square, I check to see if it needs to be cut on the fold. Because I cut bands straight across and not on the fold, I check the length of a band pattern piece that uses the fold, then I double that length. So, if the pattern piece for a band is 2” x 12” and one short end shows that it should be placed on the fold, I know that I need to cut the band 2” x 24”.

When the pattern piece for a band has ends that are not square. Oops, that would be for a V Neck, and I have not made a V-neck garment in many years (too many to give you any advice on that!).

CUTTING THE BANDS

I have a 2" x 48" aluminum ruler which is very handy for cutting 2" bands. I also have two yardsticks which are 1" wide, and I can combine them to make wider bands. Here is an example of how I can cut a 4" band: I line them all up like this, and cut as far across as I can:


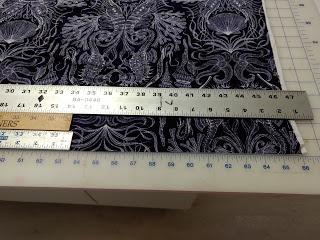
I very carefully move the wide ruler to the other end of the fabric to continue the cut:


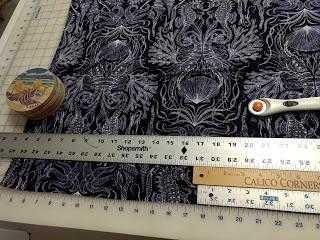
Of course, cutting a 2" band, such as I usually use for neckbands and armhole bands, is much easier for me.

Do you have a wide ruler (or two) to help you to cut even bands? Quilter’s rulers can be handy for this. Clear rulers are quite helpful when the width of the band includes a fraction, such as 1.5” (aka 1 ½”).

I hope you find these tips helpful.

Friday, August 14, 2020

Sewing with Knits My Way, Part 2

It seems I really "got into" sewing knit garments several years ago. I have learned much along the way, and I'm sharing some tips here.

Part one was posted here

2. My second tip is to always pre-wash fabrics before use, especially when I'm making clothing. I wash and dry the fabric the way it will be washed after wearing the made garment. The main reason I do this is that I don't know who has touched and dirtied the fabric. Another reason is that I want to remove any chemicals which may have been included in creating that fabric.

I use unscented liquid laundry detergent in the washing machine, and I use white vinegar in the rinse instead of fabric softener.

Extra tip: if you plan to use fabric paint, it will not stay on very long if there is a fabric softener in the fabric. That's because fabric softener usually leaves a waxy coating; the paint will stick to the coating, but the coating will wash out and the paint will eventually peel away from the fabric. This is touched upon in my tutorial for fleece socks (see the menu above).

Most of my knit fabrics tend to be created with man-made fibers, aka, not natural fibers. Some polyester fabrics can be dried on a low heat setting for short periods of time. I prefer to hang most fabrics of man-made fibers to dry. That's not a problem for me because I have a drying rack inside my sewing room. My rack only holds just under two yards of fabric with the selvages folded together. I think I have hung longer lengths by folding again from one selvage to the other and letting the fabric hang to dry for a longer time.

I personally do not concern myself with fabric stretching out when I hang it to dry. The fabric shown was bought on Amazon but is no longer available.


Perhaps the fabric relaxes when I lay it on my huge cutting table.

When I use any fabric with a cotton fiber content, I dry it in the dryer. I wash and dry fabric three times if it has any cotton in it because cotton loves to shrink. Yes, cotton loves to shrink progressively, but after three washer and dryer cycles, the shrinking pretty much stops.

People who claim that they never prewash their fabric are more likely to be quilters, as many quilters believe that letting the fabric shrink after a quilt is made will give it character. I believe this type of “character” (shrinkage) should not happen to any clothes I make.

I hope you find these tips helpful.

Saturday, August 8, 2020

Sewing with Knits My Way, Part 1


It seems I really "got into" sewing knit garments several years ago. I have learned much along the way, and I'm sharing some tips here.

1. My first tip is to use the right fabric for the garment. Sometimes it is as obvious as not using a heavy fabric for a summer garment. A heavy fleece works well in garments to be worn in cold weather. A thin knit works well in garments to be worn in hot weather but sometimes works well in garments meant to be layered. A firm, thick knit works well in structured garments. A thin knit works well in garments that need the fabric to drape softly. A loose type knit of any sort, such as a sweater knit, can be tricky and needs special skills. A thin to midweight firm knit is easiest for me; that includes ITY (Interlock Twist Yarn), jersey, and thin Ponte.

Quite often, a pattern designer will include a list of fabrics suitable for the item. Included will be helpful fabric clues, such as fabric weight, required stretch percentage, whether the stretch should go in more than one direction, and fiber content. Search the company’s blog, if the designer has one, for the pattern name; it’s possible that you can find more information that way.

Fabric that is very stretchy works well for garments that are fitted or have negative ease and are tight to the body. For a fabric that has a lot more stretch than the pattern suggests, going down a size is something to consider, but should be tested first. A fabric with not enough stretch could possibly be too tight.

Generally, a light- to mid-weight knit with 5% Lycra has about 40% stretch. This is easy to test and does not need a chart. Fabric stretch should be tested in two directions: across the grain (from selvage to selvage) and along the grain (from one cut end to the other).

Please test the fabric’s stretch AFTER it has been laundered (see the next step, coming soon). Meanwhile, here is how I test the stretch of a fabric:

Pinch a 10-inch length of fabric and see how far it will stretch. This picture shows that the fabric will stretch three inches past the 10-inch park. Multiply by 10 the number of inches that the fabric stretches past the 10-inch mark to get the percentage of stretch. Three inches of stretch means that this fabric has 30% stretch:

LINKS FOR YOU

Here are some links that describe types of knit fabrics and discuss stretchiness:
  • Stretch fabric guide from Tissura here
  • 2-way vs 4-way stretch fabric from Sewing is Cool here
  • Knit fabric discussions from Fabric.com here
  • Knit fabric types from SewGuide here
I have not made anything with a sweater knit yet. If you really want to make something with a sweater knit fabric, please follow these links to learn more about sewing with sweater knits:
  • Love Notions sweater knit sewing tips here
  • Fabric.com knit sewing tips here
I hope you find these tips helpful.