Showing posts with label tutorial. Show all posts

Sunday, March 9, 2014

This and That

I tried a little Bike Week fashion on my hands a few weeks ago - a little red with chrome tips.  I did this myself, but it took me all weekend.  The red is Revlon colorstay 070 wild strawberry, and the silvery is essie nothing else metals.

Last week I had my nails done with gel in a sparkly purple tone.  DH told me that I'd been looking at purple nail polish for so long, I should just get it out of my system:

I updated the Tote Bag Tutorial, which is really just pictures with instructions.  the photo album had gotten out of order, so I removed it and reorganized it before uploading it again.  See the Tutorial tab above.

I have been slowly - snail's pace - clearing off the sewing table.  It has "flat surface syndrome" you know, and my sewjo has gone awol due to a project which is more "have to do" than "want to do."  I'm almost "over it," and expect to get back to sewing soon.

Friday, August 3, 2012

Three Weeks to Two Sheets

YES!!  I finished the blue bed sheets.  I can blame Marco for the top sheet being crooked:

It's such a relief to finish this project.  I worked on the top sheet a little bit almost every night this week after work.

There is a bed sheets article on my Tutorials page (see the link above).  Now that I've finished another set of sheets, I should probably update the words that explain how I make bed sheets.  I want my tutorials to be helpful to you, so please ask any questions you have about how I make bed sheets.

I have some fabric to make pillow cases, but it's so new that it hasn't been properly aged yet.  The cotton fabric has, however, been laundered three times.

Now I have to decide what I want to make next.  It will probably be a summer dress.  I have two choices for fabric.  One is the red flower fabric which served time temporarily as a top sheet:

The other fabric choice is a blue flower print that I found at JA's:

It will be a long dress and it will have an empire waist.  I have not decided yet what the other style details will be.  It could have a cross-over bodice and cap sleeves, or it might be a peasant style.

I do not like having to make such important decisions!

Sunday, April 22, 2012

Published my first project to craftsy!

I truly believe the Internet is for sharing information, so I finally Posted my Tote Bag Tutorial to Craftsy (click here).  I've added this information to the Craftsy post:

"I started to make these in 1990 when a local grocery store gave a five-cent credit for each shopping bag brought in. The straps go around the bottom, from one side to the other, to hold the weight of a full bag of groceries. Since then, I've improved the instructions and added pictures."


If you try this project, please let me know.  Also, I want to know if there are any corrections to be made to the instructions.

Thank you for reading and sharing my blog!

Thursday, April 19, 2012

Tote Bag Tutorial

Washable tote or shopping bag, sturdy enough to carry groceries or fill with library books.

I started to make these in 1990 when a local grocery store gave a five-cent credit for each shopping bag brought in.  This was before stores started selling bags for 99 cents.  The straps of this bag go around the bottom, from one side to the other, to hold the weight of a full bag of groceries. Since then, I've improved the instructions and added pictures.

These tote bags are washable and have several external pocket options:
  • double pockets with elasticized hems (green & red bags)
  • double pockets with flat hems (not shown)
  • individual pockets with flat hems (blue bag)
The tote bag bottom measures 6" x 13" and the bag is 12" high.


Supplies:

3/4 yard of sturdy fabric (at least 45" wide) such as heavy denim, canvas, double-cloth upholstery, or heavy brocade. If using a less stable fabric, you need 1 yard woven interfacing.  Please prewash the bag fabric and the straps (but not the interfacing).


Cut out the following:

  • 20" x 32" bag fabric
  • 11" x 7" bag fabric for each double pocket (green & red bags)
  • 6" x 6" bag fabric for each individual pocket (blue bag)
  • 5" piece of narrow elastic (1/4" to 1/2") for each pocket (optional)
  • 20" x 30" woven fusible interfacing  -- if fabric is not very sturdy 
  • 1" wide cotton webbing, 92" long
  • 6" x 13" Plastic canvas and/or craft foam sheet (optional inserts)
Other Supplies:  Long ruler or yard stick, pencil, scissors or rotary cutter and mat, sewing machine, size 80/12 universal sewing machine needle, polyester thread to match fabric, iron and ironing board, and lots of pins.

If you don't have a rotary cutter and mat, you may draw your cutting lines directly onto the back of the fabric with pencil before you cut it.

Gathered, Double Pockets (green & red bags):

Serge or zigzag the short ends of each pocket piece.  Fold one end 2" to the wrong side of the fabric, and fold the other end 1" to the wrong side of the fabric.  Steam press and let cool.
Fold the pocket, wrong sides together, so that the wide hem extends beyond the narrow hem.  Steam press and let cool.  Trim the sides in an angle cut so that the fold is 1/2" narrower than the wide hem.
After both sides are trimmed, it looks like this:
Unfold each pocket and stitch down each hem about 1/8" from the inner edge of the hem.
On the end with the wide hem, stitch one more row to match the other hem width.
Run a 5" piece of narrow elastic through each pocket casing and tack down the ends.  Baste the pocket edges together.

Flat, Double Pockets (not shown):

Cut each pocket piece to 11" x 6."  Do not trim the sides in an angle cut.  Do not insert elastic in the pocket hems.  All other directions are the same as above.

Individual Pockets (blue bag):

For each pocket, turn and stitch a 1" hem at the top and press under 1/2" at the bottom.  Do not follow any other directions above.

Set the pockets aside for now.

Prep the Body of the Bag:

Place the fusible side of the interfacing on the wrong side of the bag fabric.  The interfacing is one inch shy of the bag fabric at both ends (to reduce thickness at the hems.)  Pin and steam press, then let it cool.  The 20" edges are the top hem edges, and the 32" edges are the side edges.  If the interfacing extends beyond the long edges of the bag fabric, trim off the excess interfacing.
Fold the bag in half, right sides together, hem edges matching (my apologies - the picture shows wrong sides together).  The resultant fold is the bottom center line.

On each end of this fold, mark a rectangle 3" from the cut edge and 2.5" from the fold.  Cut out each rectangle through all layers of fabric.  Discard the removed rectangles.
Open out the body of the bag and zigzag or serge the top hem edges at each end of the fabric.
At each top hem edge, find the center of the hem edge and place a pin at the center of the top hem edge.  Place one pin on each side of the center pin, spaced 2.5" to either side of the center pin.  This marks a 5-inch spread.  The center hem pin may be removed from each hem edge, leaving two pins that are 5" apart.
Also place a pin at the center of each side cutout.
A ruler is shown aligned with the pins at the center of each side cutout.  This shows the location of the bottom center line of the bag.

Add the Straps

Place a pin at the center of the strap, and place a pin in it.  The pin at the center of the strap is placed at the edge of the ruler.  The pin is in line with the center of the side cutouts.  The strap is pulled tightly to assure that it is straight.
While pulling the strap tightly, align the inner edge of the strap 2.5" from the center on each top hem edge, while also keeping the strap's center pin aligned with the ruler at the center bottom.
Pin through the strap and bag at each hem edge.  Keeping the strap flat, bring each end of the strap around to the other side of the center bottom line.  Overlap the cut ends of the strap by 1", and pin together though the center of the overlap.

Place the overlap's center pin at the edge of the ruler.
Align this side of the strap in the same way as the other side.  The center pin is at the edge of the ruler, the strap pulled tightly so it is straight, and the inner edges of the strap are along the outer hem pins.
Make sure that the straps are not twisted.  The same side of the strap should always be facing up.
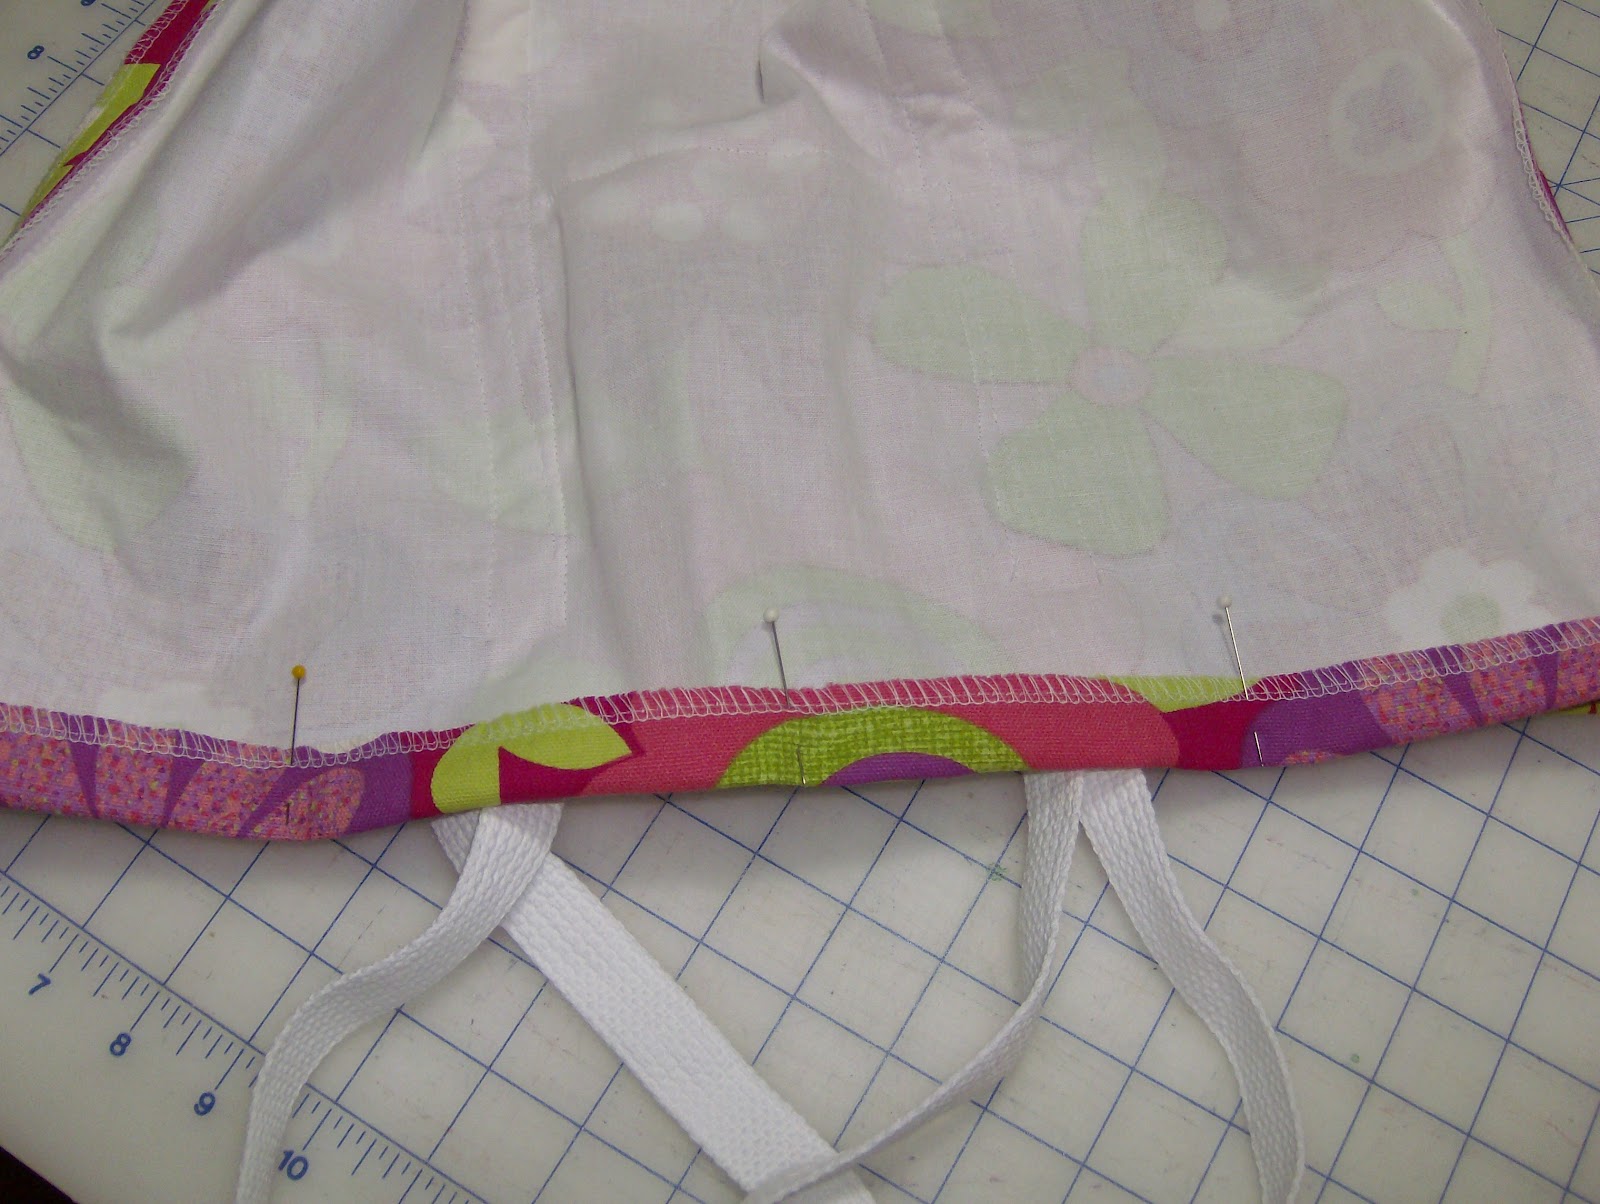
Place a pin 3" from top hem edge at both ends of both sides of the strap - 4 locations.  Secure the strap sections with more pins between these pins.
Lift the overlapped strap edge out of the way.  Stitch along the edge of the entire underlapped strap section, starting at one side of the pin (3" from top hem edge) to the raw edge of the strap, turn, stitch across the raw edge of the strap, and back up to the pin (3" from top hem edge).
The thread tails show that the underlapped part of the strap has been stitched along the edge, starting and stopping at the pin 3" from the top hem edge.
Fold the overlapped part of the strap so that the raw edge is not at the same place as the raw edge of the underlap. Stitch along the inner edge of the overlap, starting 3" from the strap's fold (near the center bottom), down to and across the fold, and up the outer edge to the pin (3" from the top hem edge).  This leaves one half of one side of the strap attached only on its outer edge.
On the other side of the bag, stitch along only the outer edge of the strap, from one pin (3" from top hem edge) to the other pin (3" from the top hem edge at the opposite end of this strap section).

Attach the Pockets

On the section of the bag where both straps have an inner edge not attached, lift up both sides of the strap.  Place the top edge of the pocket 4" from hem end, and pin in place along the sides and bottom of the pocket.  Each side of the pocket should extend about 1/2" under the strap.

If your pocket has elastic, the bag will bunch up under the pocket, between the straps.

Stitch along the edge of the sides and bottom of the pocket assembly.  Use basting stitches or big zigzag stitches along the sides.  These will be covered by the straps.  Use regular stitching along the bottom of the pocket.

If you want to layer two separate pockets, as shown on the blue bag, pin and sew the pocket closest to the hem before you attach the other pocket.  The top edges of the pockets on the blue bag are 2.5" apart.

Lay the straps back down over the pocket(s).

On the side of the bag having the strap overlap, stitch along only the inner edge of the strap.  Start at the pin which is 3" from the top hem edge, stitch to and over the previous stitching, backstitch, and stop.

On the other side of the bag, stitch along only the inner edge of the strap, from one pin (3" from top hem edge) to the other pin (3" from the top hem edge at the opposite end of this strap section).

Shape the Bag

Fold the bag, right sides together. and pin in place so the sides match at the side cutouts and at the top edges of the interfacing.  Stitch each side seam with a 1/2" seam.  While the bag is still folded, mark the fold where the corner is cut out (far left of the picture) with a pencil or permanent marker; do this at both cut-outs.  This is the bottom center line mark.
Press the side seams flat, then press them open.  Serge or zigzag the raw edges of each side seam, then press open again.
To attach the ends to the bottom, fold the bag so the bottom of the side seam matches the bottom center line mark.  Pin in place.
Stitch each end to the bottom with a 1/2" seam, then serge or zigzag the edges together.  If you serge this, use a double-eyed needle or tapestry needle to pull the serger thread tails into the seam allowances.

Finish up with Hem and Straps

Turn the top hem edges 1" to the inside and pin in place, leaving straps loose.
Stitch the hem, but do not stitch through the straps.

Pin the straps at each upper hem edge.  Stitch along the edges of the straps, starting about 4" from each top hem edge.  Overlap previous stitching, sew towards the hem, turn at the top hem edge, and sew across just below the hem.  Turn again to sew away from the hem for about 4", overlapping previous stitching..
When all stitching is done, tie off and cut all thread ends.

Optional Bag Inserts

Trim the plastic canvas on one end and one side by one row.  Cut the craft foam to the same size.  These fit in the bottom of the bag to give it some stiffness.


I hope you enjoy these instructions and find them helpful.

Please let me know if you find an error or have a question, and i will be glad to answer.

Monday, April 16, 2012

Working on my Blog

I have been wanting to work on my tutorials section, starting with the tote bag instructions.  The tote bag instructions are currently just the comments under the pictures (look here).  I want to finesse the instructions and share them with you.

Today, I started by listing the supplies needed for the tote bag project.  I have saved the instruction page as a draft so that I can work on it just a bit each day.

Another thing I've been wanting to do is place a link to iherb in the right side of my blog.  I finally figured it out. I added the Picture gadget, which allowed me to assign it a link.  Yaayy!


Thanks for reading!

Sunday, March 11, 2012

Sewing and Eating

We all know that sewing requires food, the nourishment that gives us the strength to sew, right?

Here's what we had for supper tonight -- pork country-style ribs (which DH grilled with his special sauce), steamed asparagus (topped with butter), and a cherry tomato salad (I found the recipe here).  This is a very Paleo meal (at least to my understanding) because it contains only "real food" -- no grains, no processed carbs, and no chemicals:

Here's a light-weight knit I bought on sale at JA's a couple days ago.  I bought 1.5 yards of this sale fabric, and with 40-percent off (plus tax) it cost me approximately $12.50.  I think that's pretty good!  It will become a top of some sort.  Isn't it pretty?  It will go with all my purple and fuchsia pieces, and maybe even some red or black pieces:

I hope to get back to work on my skirt soon.  You believe me, don't you?  Most recent pictures of the skirt are here.

I also plan to make an actual container to hold the paper napkins that sit on my kitchen counter.  I want to make a short basket based on Debbie Cook's Ikea-style bins.  Look here to see what I mean.  DH doesn't know it yet, but he will help me make this.

If DH want another set of custom sheets like you can see here, we have to find a very good price for extra-wide fabric, which is usually called quilt backing.  I still have to write the tutorial for making sheets, but you can click here to see the instructions that are with the pictures.

As if there weren't enough projects in the planning stage around here, we bought a huge wedge pillow at BB&B (with a coupon, of course!).  It comes with a flimsy pillow cover, but we prefer two pillow cases on all our pillows.  When I get around to making this pillow cover, I will share the instructions.

Saturday, May 30, 2009

Tote Bag Tutorial

Click on this picture to see all the pictures that go with this tutorial:
Sewn Tote Bags
Cut the following pieces:
  • One piece of light-to-mid weight bag fabric 20" x 32" and one piece of woven fusible interfacing 20" x 30". If you use a heavy-weight bag fabric, you may omit the interfacing. The 20" edges of the fabric are the top hem edges, and the 32" edges of the fabric are the side edges.
  • One strap of 1" wide woven cotton webbing 94".
  • Pocket: One piece of bag fabric 11" x 7" and two pieces of elastic cut to 5".
To make the pocket, serge the 7" edges. Turn one serged edge 2" to the wrong side, and press in place. Turn the other serged edge 1" to the wrong side, and press in place. Fold wrong sides together with the 1" hem on top, with the fold 1" from the other folded end, and press in place. Trim a tiny wedge off each pocket side, starting 1/2" from the outer edge of the fold, tapering to nothing at the upper edge of the pocket assembly. To form the elastic casings, stitch down the serged edges and stitch again 1" from the fold of the deeper hem. Insert one piece of 5" elastic into each casing, aligning the elastic to the fold edge of the casings, and zigzag the elastic ends into place. Baste the pocket sides together.

Steam the wrong side of the interfacing to the wrong side of the bag fabric, leaving 1" bag fabric showing at each end.

Serge finish all edges of the bag fabric, trimming off only excess interfacing.

Fold the bag in half so that the ends of the interfacing align at the sides. The fold forms the bottom center line. To form the bottom corners of the bag, cut out the corners of the bag at the fold 3" into the bag from the sides and 2.5" into the bag from the fold.

Lay out the bag piece, right side up. Place a pin at the center of each top hem edge. Place one pin 2.5" to either side of the center pins, then remove the center pins. The remaining pins are 5" apart.

Place a pin at the center of each cut-out at both sides. To show the bottom center line of the bag, lay a ruler across the bag, from side to side, lined up to one side of the side center pins.

Place a pin at the center of the strap. Without twisting the strap, overlap the cut ends by 1". Pin the cut ends of the strap together, placing the pin 1/2" from both cut ends.

Align the middle of the strap to the outside of the top hem edge pins on one side, aligning the center pin to the bottom center line of the bag. Stretch the strap, and pin in place at each top hem edge. Fasten the strap to the bag with one pin 3" from each top hem edge. Secure with more pins between these two pins.

Without twisting the strap, align the strap to the outside of the end pins on the other side. Align the pin at the strap-end overlap to the bottom center line of the bag. Stretch the strap, and pin in place at each top hem edge. Fasten the strap to the bag with one pin 3" from each top hem edge. Secure with more pins between these two pins.

Remove the pin where the strap ends overlap. For the section of strap that goes under the other end of the strap, edge stitch starting 3" from the top hem edge of the bag, turning twice at the cut end of the strap, and ending 3" from the top hem edge of the bag.

Tuck the upper strap piece's raw edge under so that the raw edge is enclosed, and pin in place. Edge stitch the upper strap section along the outside edge, starting 3" from the strap's fold, turning twice at the fold, and ending about 3" from the top hem edge of the bag.

Edge stitch along the outer edge of the strap on the opposite side, starting 3" from one top hem edge and ending 3" from the other top hem edge.

On the part of the bag where both inner strap edges are free, place the top edge of the pocket 4" from the top hem edge, centering the pocket between the straps, and pin in place. Baste the side edges of the pocket in place, stitching the bottom edge of the pocket securely to the bag.

Stitch all remaining strap edges to the bag, ending 3" from the top hem edges. The inner edges of the strap will encase the raw edges of the pocket.

Stitch the sides by folding the bag right sides together, aligning top edges of interfacing at the top and bottom of each side. Pin in place and stitch a 1/2" seam. Press the side seams flat, then press them open.

Make the bottom corners by aligning the bottom edges of the sides to the bottom center line, and pin in place. Stitch with a 1/2" seam. Serge the raw edges of this seam and thread the serger tails through the seam.

Turn the top hem to the inside 1" and pin in place. Topstitch this hem in place, avoiding the straps.

To secure the straps to the top of the bag in each of four locations, stitch along the inner edge of the strap, overlapping the previous stitching, up to and across the top hem edge, and ending by overlapping the previous stitching on the outer edge of the strap.

Please, if you have any questions or suggestions, let me know!