Saturday, April 28, 2012

Sewing-Related Counting

I have not done any sewing lately, but I have been counting my patterns.

I already logged the current patterns I have for sale (click here).

I went through all my patterns a few weeks ago and set aside - gasp! - more patterns to sell.  I finally got out those boxes and logged all those patterns.  Three or four patterns went back into the "keep" boxes.

During this past week, I went through the boxes of patterns that I'm keeping.  I logged all those patterns and I found at least five patterns that are now in the boxes of patterns that I will sell.

Even though I have not done any sewing for a while, I feel that much was accomplished by all this counting and logging.  Doesn't it feel good to get such a daunting task completed?

Thursday, April 26, 2012

Not Quite Jumpin' Jack Flash

... it's a gas, gas, gas!

OK, so it just smells like gas, of a particular type.

Why?

Oh, just some vegetables I cooked up as part of our supper tonight.  It's important when eating Paleo to include lots of vegetables in out diet.

Innocent.

Cute.

Little.

Stinky.

Vegetables.

Yeah, those.

Brussels sprouts.

Yummy!  If you never liked them before, I challenge you to try them this way.  It's the only way DH will eat them.  Hah!  It's pretty much the same way we make kale in that it requires bacon, butter, and onions.  To see how we fix kale, click here.

Start with a large pan.  Cut two strips of bacon into pieces, about 1/2 inch.  Also chop half an onion.  Slice about 1/4 stick of butter.  Put these into a large skillet, and turn the heat on low.

Cut off the stem ends of a package of Brussels sprouts.  Of course I think to check the amount on the package - after I've thrown away the package and taken out the trash.

Cut each Brussels sprout into quarters, lengthwise, so the leaves will stay attached to the core.

Add the Brussels sprouts to the pan, cover, and cook on low, stirring occasionally.

When they start to soften and some of the edges appear slightly charred, they are done.

Unless, of course, you want more edges charred.

They taste great, but after I took the dogs for a walk and came back into the house, it smelled like someone had been passing gas, and lots of it.

DH insists the he can - literally - fart around tomorrow, since he works at home, and not bother anybody.  I, however, risk offending people where I work.  Oh, boy ...

Sunday, April 22, 2012

A Peek at my BlogRoll

I would like to introduce you to a blogger on my BlogRoll:

Mimi G - DIY Fashiion and Style

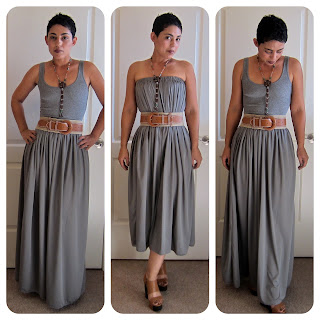
Mimi often shows what she wears, and she is one stylin' chick!

She also tells how to make some of her clothes.  Here's a recent tutorial (click here).

Today she has a drawing to win a sewing machine (click here).  I'm entering this drawing.  One can never have too many sewing machines!

Recent Paleo Food

We've been trying to eat Paleo, and do best when we are at home.  Mark's Daily Apple is one of our favorite web sites for information.  He has a section on the sidebar called "Primal 101" that is a guideline for people who want to eat this way or to learn more about it.

Here's the side dish we had recently with supper.  Kale is a nutrient-dense, green, leafy vegetable, that we can only seem to tolerate when it has bacon in it.  Instead of parboiling it before preparing the dish, I rely on the water left inside the curliness to steam the kale in the skillet:
  1. Cut up two pieces of bacon, and sautee slowly in large skillet with butter and/or coconut oil, some chopped onions and/or garlic, and 1/4 cup shredded coconut.
  2. Cut up half a bunch of kale, rinse and drain two times, and add to the skillet.
  3. Stir in 1 cup coconut milk and a few shakes of powdered curry.
  4. Cover and cook on low for about five minutes.


For breakfast this morning, hubby made No-Carb Coconut Biscuits (click here for recipe), with chopped (cooked) bacon and shredded cheese inside:


Published my first project to craftsy!

I truly believe the Internet is for sharing information, so I finally Posted my Tote Bag Tutorial to Craftsy (click here).  I've added this information to the Craftsy post:

"I started to make these in 1990 when a local grocery store gave a five-cent credit for each shopping bag brought in. The straps go around the bottom, from one side to the other, to hold the weight of a full bag of groceries. Since then, I've improved the instructions and added pictures."


If you try this project, please let me know.  Also, I want to know if there are any corrections to be made to the instructions.

Thank you for reading and sharing my blog!

Saturday, April 21, 2012

Toilet Brush Holder - Craft

It's not very often I do a non-sewing craft project.  This project is because (pick one, or two) a) I'm a tight-wad, and/or b) I couldn't find what I wanted within two miles of my house.

Our bathroom has a toilet brush that sits in its own holder.  Because that holder is hard plastic and is getting old, pieces have been chipping off, and is falling apart.

While out shopping with my cousin one night recently, I decided to look for a new toilet brush holder.  OK, the new holder would come with a new toilet brush, but I don't really need a new brush.  Besides, we only looked at the dollar-type store which was on the way home from our other shopping, and after I remembered that I wanted to look for a new holder.

"So," asked my cousin, "why don't you just make one with the vinegar jug that's in your recycling bin?"

DING-DING-DING!!  oh, and "DUH!"

On this lazy Saturday morning, I decided to do just that!

Here's what I did before I thought to take the first picture:

  • found the discarded plastic vinegar jug
  • found a bowl that was bigger than the toilet bowl brush
  • used a pen to trace the bowl onto paper and cut it out
  • wet the paper circle and stuck it on the jug, centered on the seam opposite the jug handle
  • used a paper towel to pat the circle dry, then let it dry a little more
  • used the marker to trace around the circle
  • used a relatively flat discarded candy box to guide the marker for the straight lines


I quickly found that the kitchen scissors would not cut into the top of the bottle.  Apparently the plastic is thicker there.  I asked DH if he had something to cut the plastic jug.  He brought the tin snips from the garage and cut right through the top of the bottle.  Then he changed to the kitchen scissors and cut out the plastic where I had marked.

This is only my second craft project since my earring holder.  How do you like it?

Thursday, April 19, 2012

Tote Bag Tutorial

Washable tote or shopping bag, sturdy enough to carry groceries or fill with library books.

I started to make these in 1990 when a local grocery store gave a five-cent credit for each shopping bag brought in.  This was before stores started selling bags for 99 cents.  The straps of this bag go around the bottom, from one side to the other, to hold the weight of a full bag of groceries. Since then, I've improved the instructions and added pictures.

These tote bags are washable and have several external pocket options:
  • double pockets with elasticized hems (green & red bags)
  • double pockets with flat hems (not shown)
  • individual pockets with flat hems (blue bag)
The tote bag bottom measures 6" x 13" and the bag is 12" high.


Supplies:

3/4 yard of sturdy fabric (at least 45" wide) such as heavy denim, canvas, double-cloth upholstery, or heavy brocade. If using a less stable fabric, you need 1 yard woven interfacing.  Please prewash the bag fabric and the straps (but not the interfacing).


Cut out the following:

  • 20" x 32" bag fabric
  • 11" x 7" bag fabric for each double pocket (green & red bags)
  • 6" x 6" bag fabric for each individual pocket (blue bag)
  • 5" piece of narrow elastic (1/4" to 1/2") for each pocket (optional)
  • 20" x 30" woven fusible interfacing  -- if fabric is not very sturdy 
  • 1" wide cotton webbing, 92" long
  • 6" x 13" Plastic canvas and/or craft foam sheet (optional inserts)
Other Supplies:  Long ruler or yard stick, pencil, scissors or rotary cutter and mat, sewing machine, size 80/12 universal sewing machine needle, polyester thread to match fabric, iron and ironing board, and lots of pins.

If you don't have a rotary cutter and mat, you may draw your cutting lines directly onto the back of the fabric with pencil before you cut it.

Gathered, Double Pockets (green & red bags):

Serge or zigzag the short ends of each pocket piece.  Fold one end 2" to the wrong side of the fabric, and fold the other end 1" to the wrong side of the fabric.  Steam press and let cool.
Fold the pocket, wrong sides together, so that the wide hem extends beyond the narrow hem.  Steam press and let cool.  Trim the sides in an angle cut so that the fold is 1/2" narrower than the wide hem.
After both sides are trimmed, it looks like this:
Unfold each pocket and stitch down each hem about 1/8" from the inner edge of the hem.
On the end with the wide hem, stitch one more row to match the other hem width.
Run a 5" piece of narrow elastic through each pocket casing and tack down the ends.  Baste the pocket edges together.

Flat, Double Pockets (not shown):

Cut each pocket piece to 11" x 6."  Do not trim the sides in an angle cut.  Do not insert elastic in the pocket hems.  All other directions are the same as above.

Individual Pockets (blue bag):

For each pocket, turn and stitch a 1" hem at the top and press under 1/2" at the bottom.  Do not follow any other directions above.

Set the pockets aside for now.

Prep the Body of the Bag:

Place the fusible side of the interfacing on the wrong side of the bag fabric.  The interfacing is one inch shy of the bag fabric at both ends (to reduce thickness at the hems.)  Pin and steam press, then let it cool.  The 20" edges are the top hem edges, and the 32" edges are the side edges.  If the interfacing extends beyond the long edges of the bag fabric, trim off the excess interfacing.
Fold the bag in half, right sides together, hem edges matching (my apologies - the picture shows wrong sides together).  The resultant fold is the bottom center line.

On each end of this fold, mark a rectangle 3" from the cut edge and 2.5" from the fold.  Cut out each rectangle through all layers of fabric.  Discard the removed rectangles.
Open out the body of the bag and zigzag or serge the top hem edges at each end of the fabric.
At each top hem edge, find the center of the hem edge and place a pin at the center of the top hem edge.  Place one pin on each side of the center pin, spaced 2.5" to either side of the center pin.  This marks a 5-inch spread.  The center hem pin may be removed from each hem edge, leaving two pins that are 5" apart.
Also place a pin at the center of each side cutout.
A ruler is shown aligned with the pins at the center of each side cutout.  This shows the location of the bottom center line of the bag.

Add the Straps

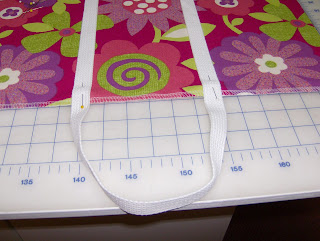
Place a pin at the center of the strap, and place a pin in it.  The pin at the center of the strap is placed at the edge of the ruler.  The pin is in line with the center of the side cutouts.  The strap is pulled tightly to assure that it is straight.
While pulling the strap tightly, align the inner edge of the strap 2.5" from the center on each top hem edge, while also keeping the strap's center pin aligned with the ruler at the center bottom.
Pin through the strap and bag at each hem edge.  Keeping the strap flat, bring each end of the strap around to the other side of the center bottom line.  Overlap the cut ends of the strap by 1", and pin together though the center of the overlap.

Place the overlap's center pin at the edge of the ruler.
Align this side of the strap in the same way as the other side.  The center pin is at the edge of the ruler, the strap pulled tightly so it is straight, and the inner edges of the strap are along the outer hem pins.
Make sure that the straps are not twisted.  The same side of the strap should always be facing up.
Place a pin 3" from top hem edge at both ends of both sides of the strap - 4 locations.  Secure the strap sections with more pins between these pins.
Lift the overlapped strap edge out of the way.  Stitch along the edge of the entire underlapped strap section, starting at one side of the pin (3" from top hem edge) to the raw edge of the strap, turn, stitch across the raw edge of the strap, and back up to the pin (3" from top hem edge).
The thread tails show that the underlapped part of the strap has been stitched along the edge, starting and stopping at the pin 3" from the top hem edge.
Fold the overlapped part of the strap so that the raw edge is not at the same place as the raw edge of the underlap. Stitch along the inner edge of the overlap, starting 3" from the strap's fold (near the center bottom), down to and across the fold, and up the outer edge to the pin (3" from the top hem edge).  This leaves one half of one side of the strap attached only on its outer edge.
On the other side of the bag, stitch along only the outer edge of the strap, from one pin (3" from top hem edge) to the other pin (3" from the top hem edge at the opposite end of this strap section).

Attach the Pockets

On the section of the bag where both straps have an inner edge not attached, lift up both sides of the strap.  Place the top edge of the pocket 4" from hem end, and pin in place along the sides and bottom of the pocket.  Each side of the pocket should extend about 1/2" under the strap.

If your pocket has elastic, the bag will bunch up under the pocket, between the straps.

Stitch along the edge of the sides and bottom of the pocket assembly.  Use basting stitches or big zigzag stitches along the sides.  These will be covered by the straps.  Use regular stitching along the bottom of the pocket.

If you want to layer two separate pockets, as shown on the blue bag, pin and sew the pocket closest to the hem before you attach the other pocket.  The top edges of the pockets on the blue bag are 2.5" apart.

Lay the straps back down over the pocket(s).

On the side of the bag having the strap overlap, stitch along only the inner edge of the strap.  Start at the pin which is 3" from the top hem edge, stitch to and over the previous stitching, backstitch, and stop.

On the other side of the bag, stitch along only the inner edge of the strap, from one pin (3" from top hem edge) to the other pin (3" from the top hem edge at the opposite end of this strap section).

Shape the Bag

Fold the bag, right sides together. and pin in place so the sides match at the side cutouts and at the top edges of the interfacing.  Stitch each side seam with a 1/2" seam.  While the bag is still folded, mark the fold where the corner is cut out (far left of the picture) with a pencil or permanent marker; do this at both cut-outs.  This is the bottom center line mark.
Press the side seams flat, then press them open.  Serge or zigzag the raw edges of each side seam, then press open again.
To attach the ends to the bottom, fold the bag so the bottom of the side seam matches the bottom center line mark.  Pin in place.
Stitch each end to the bottom with a 1/2" seam, then serge or zigzag the edges together.  If you serge this, use a double-eyed needle or tapestry needle to pull the serger thread tails into the seam allowances.

Finish up with Hem and Straps

Turn the top hem edges 1" to the inside and pin in place, leaving straps loose.
Stitch the hem, but do not stitch through the straps.

Pin the straps at each upper hem edge.  Stitch along the edges of the straps, starting about 4" from each top hem edge.  Overlap previous stitching, sew towards the hem, turn at the top hem edge, and sew across just below the hem.  Turn again to sew away from the hem for about 4", overlapping previous stitching..
When all stitching is done, tie off and cut all thread ends.

Optional Bag Inserts

Trim the plastic canvas on one end and one side by one row.  Cut the craft foam to the same size.  These fit in the bottom of the bag to give it some stiffness.


I hope you enjoy these instructions and find them helpful.

Please let me know if you find an error or have a question, and i will be glad to answer.

Monday, April 16, 2012

Working on my Blog

I have been wanting to work on my tutorials section, starting with the tote bag instructions.  The tote bag instructions are currently just the comments under the pictures (look here).  I want to finesse the instructions and share them with you.

Today, I started by listing the supplies needed for the tote bag project.  I have saved the instruction page as a draft so that I can work on it just a bit each day.

Another thing I've been wanting to do is place a link to iherb in the right side of my blog.  I finally figured it out. I added the Picture gadget, which allowed me to assign it a link.  Yaayy!


Thanks for reading!